Incoming Mail Setup
Email communication is an integral part of activeCollab. Your activeCollab can check any number of POP3 or IMAP mailboxes. You may choose to import the email messages and have sorted into the correct part of the system. This feature enables you to collaborate with your clients by using activeCollab only, to provide customer support, manage your sales, track bugs, have feature requests submitted, share files, etc.
There are a few conditions that must be met in your activeCollab for Incoming Mail to work properly:
- IMAP extension needs to be installed in your PHP Setup. If you plan to connect to POP3 and IMAP servers via SSL, make sure that you have an IMAP extension compiled with SSL support.
- If you are checking mailboxes over a secure connection, PHP needs to be compiled with SSL support.
- Since the mailboxes need to be checked frequently, you should to configure activeCollab's Scheduled Tasks.
- We highly recommend you to create a new mailbox that will be used for activeCollab only. Please note that all emails from the mailbox are deleted after activeCollab makes the import, it is best to use a separate mailbox for this purpose, instead of your business or private email.
Setting up a New Mailbox #
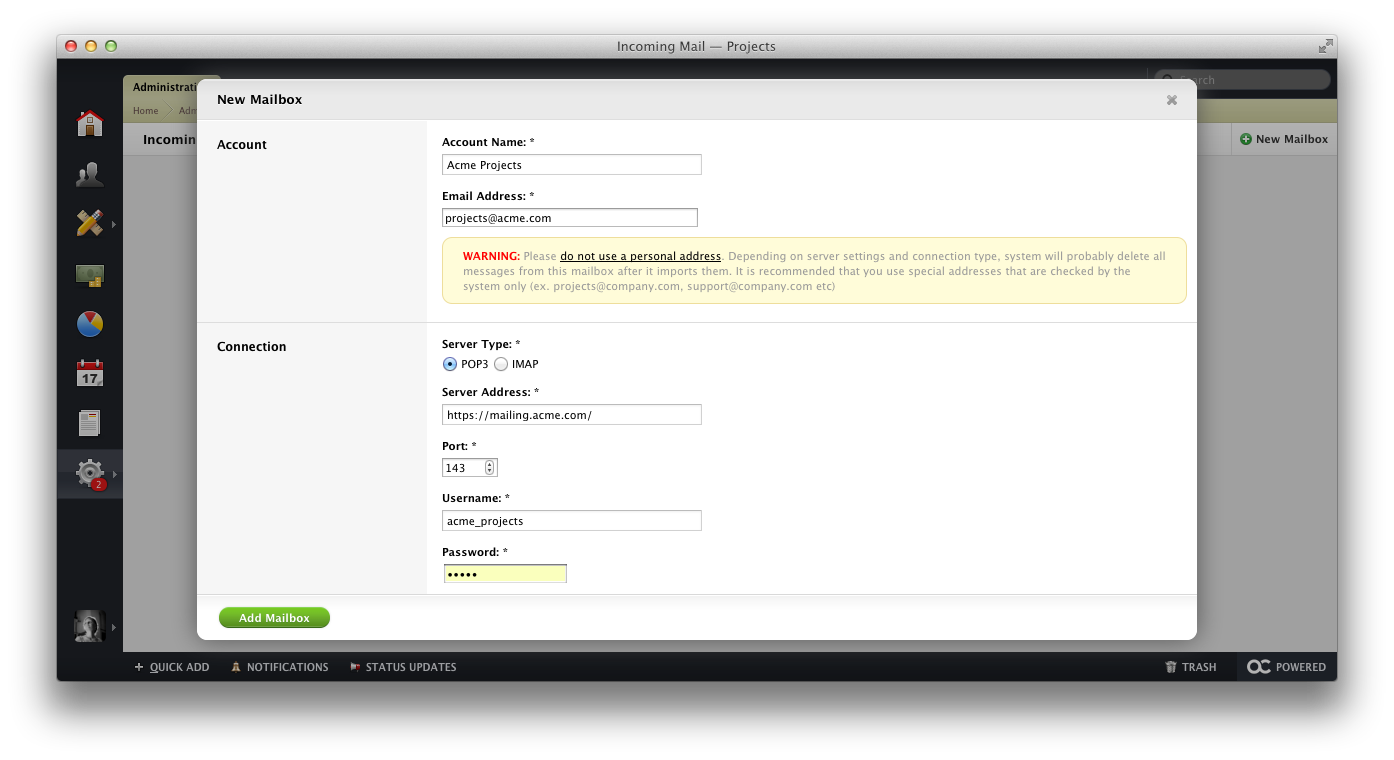
To set up a new activeCollab mailbox, open Administration > Email, click the Manage Mailboxes tab and the New Mailbox. Configure the mailbox that you wish to use. You may contact your hosting provider for the required setup information.

As you can see, the required fields for the New Mailbox are:
Account Name and Email Address - this email address will regularly be checked for new messages that will be imported into activeCollab.
Server Type - requires information such as server type and address, port (that must be opened on your server), username and password, security type used by the email account, and mailbox name; everything needs to be entered carefully to match the information from your hosting provider.
Before adding the mailbox, please check if activeCollab can connect to it. Click Test Connection button and system will do let you know whether the mailbox has been set up correctly.
You can create any number of mailboxes this way.
Sorting Incoming Messages #
After creating a mailbox, you can determine a set of rules that activeCollab will apply when receiving an email message from that mailbox. By doing so, you can teach activeCollab to sort and manage incoming emails.
For example, some of emails can be imported as a new assigned task in a project, others can start a discussion, or create a new file inside your activeCollab. Still others can be moved directly to trash.
There are two ways to handle Incoming emails:
- By Using Mail To Project
Enable Mail to Project by opening Administration > Project Settings and selecting Enable Mail To Project. Now all the projects in your activeCollab have a specific email address which can be found in the project Overview.
To create a new task, discussion or file inside that project, all you need to do is send an email with a corresponding subject to that address. For instance, to create a task, copy the desired project email address into the email "To" field, enter "Task: Task name" in the subject field and the task description into the message body, then send the email message.
- By Using Incoming Mail Filters
Incoming Mail filters help you to create new objects inside your activeCollab by defining sets of rules based on different filter parameters.
Open Administration > Email, click the Manage Filters tab and the New Filter button. You can create as many different filters as you wish. Simply set the Actions that you wish activeCollab to perform on a specific email message. For example, a filter can be configured to create a New Task in a selected project and be assigned to a specific user, with the Category, Label and priority already determined.
When using multiple incoming mail filters, make sure to sort them by importance by dragging and dropping them into place. activeCollab checks the filters one by one, in the order that they are sorted. If the email matches the first filter, the message is imported according to the rules defined in that filter. If not, activeCollab continues searching for a matching filter.
Use the Magnifying glass icon in the filter tool bar to see the filter details . To edit the filter, click the Pencil icon and make the changes you wish. A the filter can be deleted at any time by clicking the X icon.
