
Tracking Time with activeCollab Timer
The activeCollab Timer is a desktop application that enables you to track how much time has been spent working on a specific task.
By using Timer, you can:
- track time.
- submit time records you made directly to your activeCollab.
- create a new Task or complete an existing one.
- have multiple accounts for different activeCollab instances.
- and more...
The Timer is available for Windows, OSX and Linux (Debian, Ubuntu and Centos).
Connect the Timer to activeCollab #
Before you can start tracking time, you will need to add your activeCollab account to the Timer. This will allow the Timer to connect to your projects and tasks.
Please follow these steps to add your account:
Click on Account. A window with additional instructions will appear.
Select the account name. You can choose any name you like - it is for your reference only.
Enter the URL path to your API. This information is available on your activeCollab profile page under Options > API Subscriptions. Use the "Magnyfying glass icon" to see the API URL - it should look something like http://yoursite.com/api.php.
Now provide your activeCollab account login information.
At this point you will be able to synchronize your active projects with the Timer. You can choose to everything or only the selected projects.
Make sure that all the details are correct and click the Finish button.
Now that your account has been added, you can start tracking time for your projects.
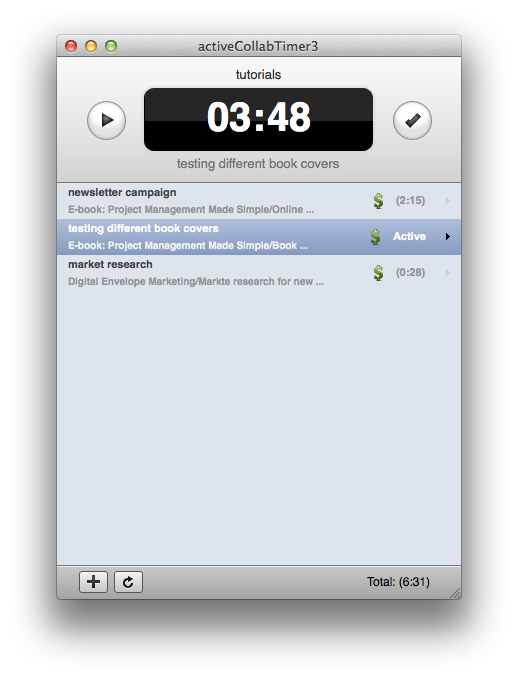
How to Track Time with activeCollab Timer? #
To start tracking time, all you need to do is click the + button to add a new timer entry. You can choose whether you wish to start a new timer, or track time against one of the Tasks in your activeCollab.
If you wish to track time for a specific Task, click the Assigned to: drop down menu and select the desired Task.
Now click the Save button and the Timer will start. To pause it, use the Pause button, and the Timer will be put on hold. If you leave your workspace unexpectedly, the Timer detects there is no activity and pauses automatically after 15 minutes. The Timer will start working again after you return to your computer.
In case you decide that you wish to work on another task, you can start one more timer entry. To do that, simply create it in the same way as described above. When you start the new Timer, your current Timer will be paused. You can have several Timers listed, but only one can be active.
Submitting Data to activeCollab #
When your work is done, use the Submit button in the header of the Timer to send your data to activeCollab. A form will appear, where you can add all additional information information. In case you have not yet set the description or connected the entry to a Project or Task, you can do that now. You can also decide to remove the Timer, or to complete the task after you have submitted the data.